1. Overview
Countdown is a math puzzle game. Given a list of numbers and a target number, the player needs to use the numbers and the four basic arithmetic operations (addition, subtraction, multiplication, and division) to form an expression that evaluates to the target number. Each number can be used only once, but parentheses can be used freely to change the order of operations.
2. Quick Start
2.1 Preparation
Download the Jiayi-Pan/Countdown-Tasks-3to4 dataset and split it into training and test sets:
python tutorial/example_countdown/prepare_data.py --target=Jiayi-Pan/Countdown-Tasks-3to4 --path=/the/path/to/store/dataset
The Countdown dataset contains the target and nums fields and requires custom data formatting logic. For example, when using the huggingface_dat_repo task reader method, you need to modify the _load_dataset_split method in ajet/task_reader/hf_dataset_reader.py:
task = Task(
    main_query=json.dumps({'target': example["target"], 'nums': example["nums"]}),
    init_messages=[],
    task_id=str(idx),
    env_type="no_env",
    metadata=example,
)
2.2 Start Training
Simply run the following command:
# It is recommended to kill all ray, vllm, and env_service processes before starting ( python launcher.py --kill="python|ray|vllm" )
ajet --conf tutorial/example_countdown/countdown.yaml --backbone='verl'
Quick Debugging (Optional)
If you want to breakpoint-debug the workflow/judge locally: When `--backbone=debug`, Ray is disabled. You can use a VSCode `.vscode/launch.json` like below:3. Understand
In this section, we will cover the details of this tutorial.
3.1 Core Process
See details in tutorial/example_countdown/countdown.py. You can create new AgentScope Workflow code anywhere in the project.
- Define the AgentScope workflow
self.agent = ReActAgent(
    name="countdown_react_agent",
    sys_prompt=system_prompt,
    model=tuner.as_agentscope_model(),
    formatter=DashScopeChatFormatter(),
    memory=InMemoryMemory(),
    max_iters=2,
)
msg = Msg("user", query, role="user")
result = await self.agent.reply(msg)
In the AgentScope Workflow,you need to write the key information required by the judge into:
WorkflowOutput(
    reward=None,
    metadata={
        "final_answer": final_answer,
        "target": target,
        "nums": nums,
    }
)
3.2 Configuration Details
Copy and modify key parameters in tutorial/example_countdown/countdown.yaml. The most relevant parts in the yaml file are marked with  symbols.
- Read task (corresponds to configuration field
ajet.task_reader) - Define Workflow (corresponds to configuration field
ajet.rollout.user_workflow) - Example: If agentscope workflow is defined in
ExampleCountdownLearnclass oftutorial/example_countdown/countdown.py - Then set
ajet.rollout.user_workflow=tutorial.example_countdown.countdown->ExampleCountdownLearn - Define scoring function (corresponds to configuration field
ajet.task_judge.judge_protocol) - Example: If agentscope workflow is defined in
CountdownAnswerAsJudgeclass oftutorial/example_countdown/countdown_answer_as_judge.py - Then set
ajet.task_judge.judge_protocol=tutorial.example_countdown.countdown_answer_as_judge->CountdownAnswerAsJudge - Specify model (corresponds to configuration field
ajet.model.path)
ajet:
    task_reader:
        type: huggingface_dat_repo # [key] `env_service` or `dataset_file` or `huggingface_dat_repo` or `data_generation`
    rollout:
        user_workflow: tutorial.example_countdown.countdown->ExampleCountdownLearn # [key] Write and select Agent
    task_judge:
        # [key] Write and select evaluation function
        judge_protocol: tutorial.example_countdown.countdown_answer_as_judge->CountdownAnswerAsJudge
    model:
        # [key] Set the model to be trained
        path: YOUR_MODEL_PATH
3.3 Code Map
tutorial/example_countdown/countdown.py: defines the AgentScope workflow (e.g.,ExampleCountdownLearn).tutorial/example_countdown/countdown.yaml: wires together task reader, workflow, judge, and model.
3.4 Reward/Evaluation Mechanism
A simple Judge is provided in tutorial/example_countdown/countdown_answer_as_judge.py. You can create new Judge code anywhere in the project.
Judge input parameters include:
workflow_task: Task information(if reference answer is included, it can be retrieved from here)
workflow_output: Task information output (final_answer needs to be added manually)
Judge return values:
- raw_reward
- is_success
4. Results
4.1 Training Curves/Metrics
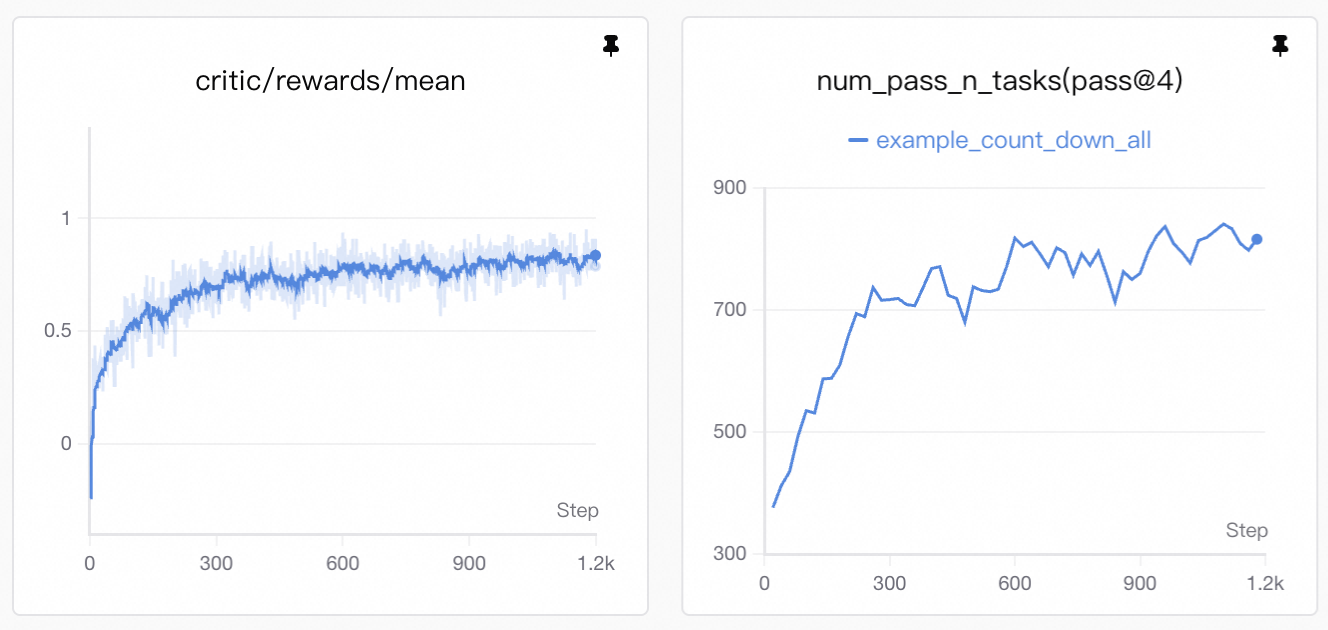
Visualization: Training curves are generated by SwanLab. See Visualization Tools for setup and usage.
The upward trend in reward reflects improvement in two key areas:
- Format compliance: the agent learns to emit well-formed
<tool_call>JSON and wrap answers in\boxed{...}. - Accuracy improvement: the agent achieves higher correctness rates in solving problems.
4.2 Case Study
Agents are already able to deal with some simple problems at the beginning of the training process; however, small models inevitably produce many answers that fail to fully meet the requirements. In some problems, the agent does not strictly follow the instructions, such as invalid output format, reusing numbers, or missing expression outputs.
bad case 1: Invalid output format.
<|im_start|>assistant
<tool_call>
{"name": "generate_response", "arguments": "Let's start by subtracting 28 from 76, which gives us 48. Now we need to get to 55 from 48. We can achieve this by adding 7 from the remaining numbers. However, 7 is not available. The next best number is 69. If we subtract 69 from 78, we get -11. If we subtract -11 from 48, we actually end up adding 11, which isn't one of our numbers. The correct approach would be to add 7 from the remaining numbers, but since 7 isn't available, we can use 69 and adjust our strategy. We can add 7 from the remaining numbers in another way. Let's try subtracting 69 from 78 to get -11, and then add 11 to 48. 11 can be obtained by subtracting 69 from 80, but since 80 isn't available, we'll use the next best approach. We'll subtract 69 from 78 to get -11, and then add 16 to 48 to reach 55. We can get 16 by subtracting 7 from 23, but since 23 isn't available, we need to find an alternative. The best way would be to use 78 - 69 = -11, and then 48 + 11 = 59 which is close but not 55. However, we can achieve 55 by using 78 - 69 + 7 = 55. So, the correct calculation is 78 - 69 + 7 = 55."}
</tool_call><|im_end|>

bad case 2: Reusing numbers in expressions.
<|im_start|>assistant
 NavParams = {"response": "Let's solve this step by step. We have the numbers 72, 20, and 4, and we need to reach the target number 38 using arithmetic operations.\n\nFirst, let's try using subtraction and addition since 72 is quite large and can help us get closer to our target if we subtract something. We can subtract 20 from 72 to get 52, which is close but still far from 38. Now, we can subtract 4 from 52 to get 48, and then subtract 10 to reach 38. Since we don't have a 10 directly, we can use 20 - 4 = 16, and then subtract 16 from 48 to get 32, and finally add 6 (which is 4 + 2) to reach 38.\n\nLet's try a more efficient approach: 72 - 20 = 52, and 52 - 4 = 48, now we need to reduce it by 10, which is 20 - 14, and 14 can be obtained by 20 - 4 - 2. So, 48 - (20 - 4 - 2) = 48 - 14 = 34, then we need 4 more to reach 38, which is simply 4. Thus, the solution is (72 - 20) - 4 - (20 - 4 - 2) + 4 = 38."}
<tool_call>
{"name": "generate_response", "arguments": {"response": "The solution is \boxed{(72 - 20) - 4 - (20 - 4 - 2) + 4}. Let's break it down: \n1. 72 - 20 = 52\n2. 52 - 4 = 48\n3. 20 - 4 - 2 = 14\n4. 48 - 14 = 34\n5. 34 + 4 = 38\nTherefore, we reach the target number 38."}}
</tool_call><|im_end|>

bad case 3: Missing expression outputs.
<|im_start|>assistant
<tool_call>
{"name": "generate_response", "arguments": {"response": "In this case, one straightforward way to reach the target number 64 is by directly using the number 64 itself, since it matches the target exactly. No other calculations are needed."}}
boxing the answer as \boxed{{64}}.<|im_end|>
However, tuning resolves these issues, as shown in the example below:
- Message 3: decomposes the problem + emits a
<tool_call>, and uses\boxed{}to output key values - Message 4: decomposes the problem further, and reuses numbers in expressions.
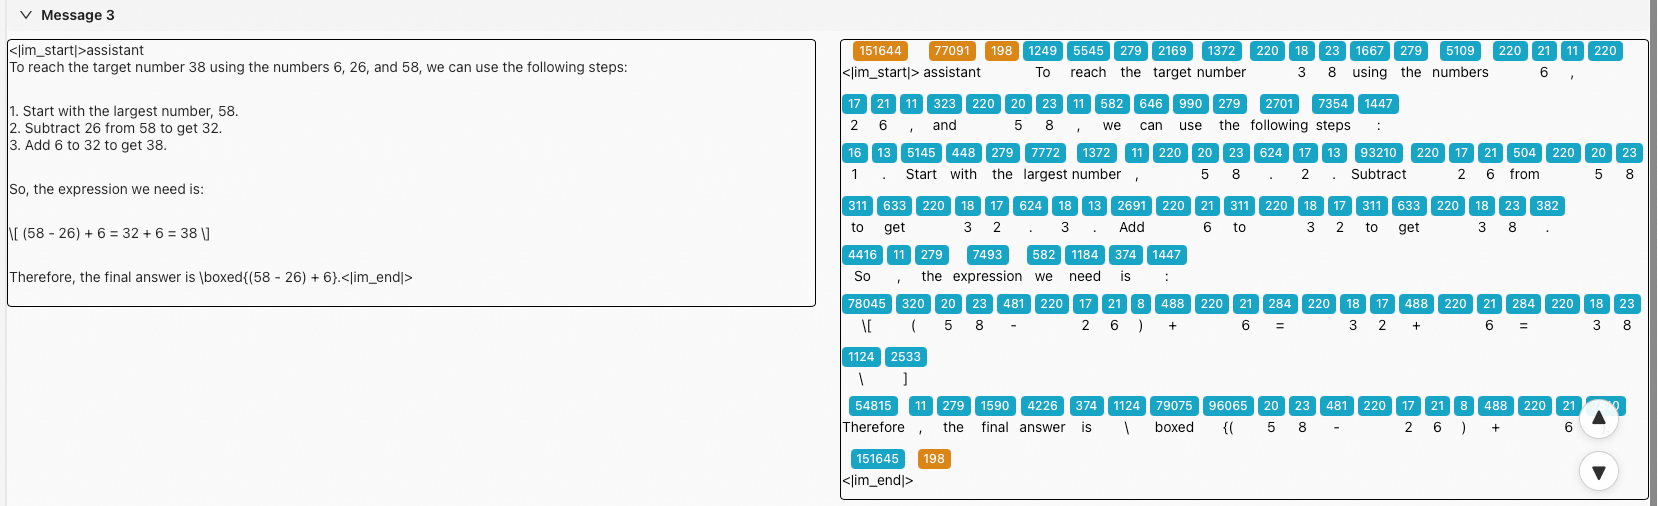
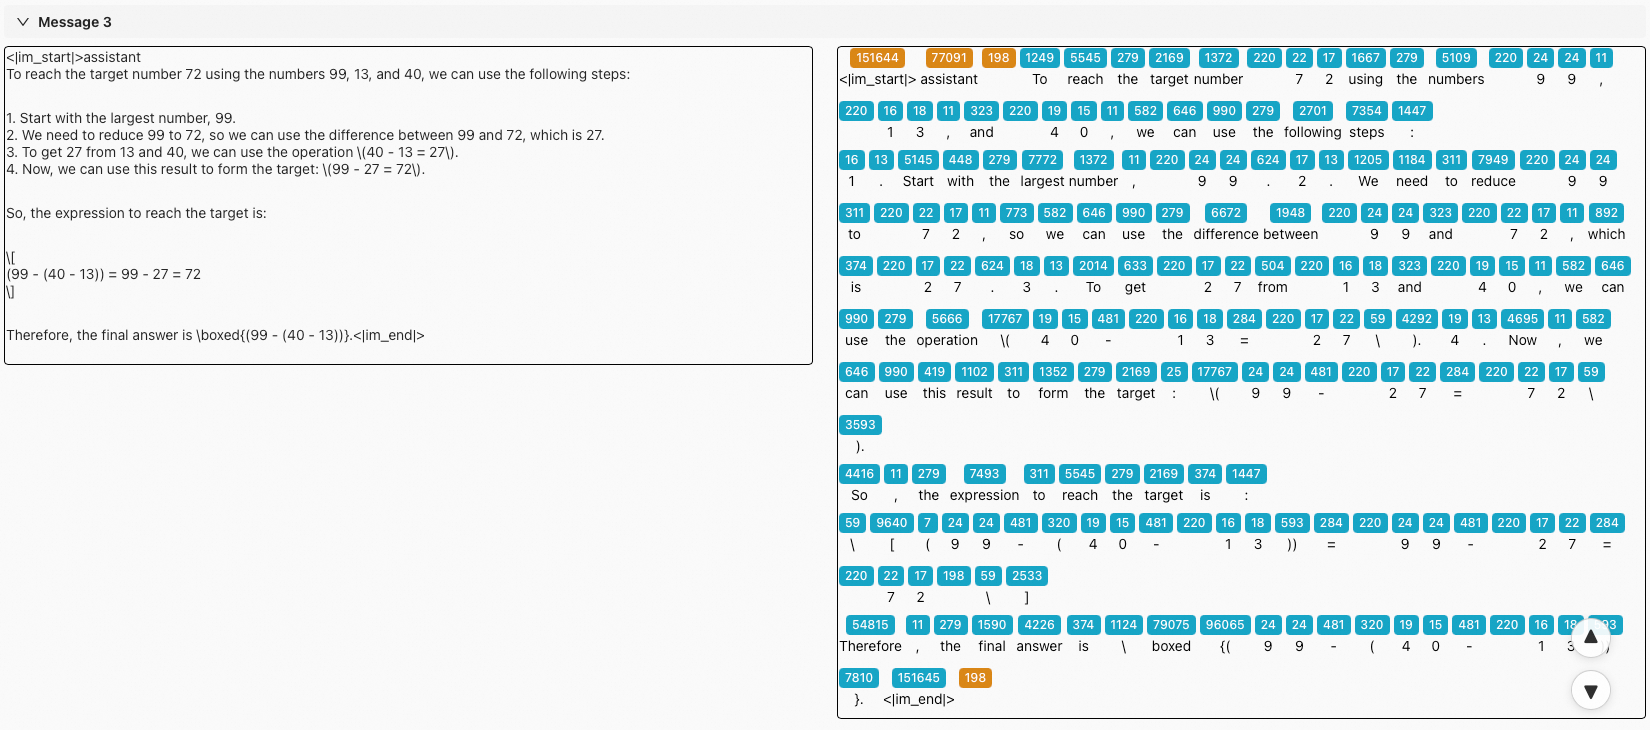
Token-level Visualization: These detailed logs are generated by Beast-Logger. See Beast-Logger Usage for more details.